Tech
Unlock Your Trading Potential: Essential Forex Tools For Every Trader
The popularity of forex trading is clearly at its peak at the moment and the global currency market has a promising future ahead as it keeps growing in every aspect. Whether it is about the ease of access or technological upgrades, forex brokers are leaving no stone unturned to provide the best trading conditions and advanced software solutions to their clients. When it comes to unlocking your true potential as a forex trader, you need to practise a lot and pick the perfect tools to sharpen your trading skills. Having knowledge about the new and improved forex tools is essential for beginners and professionals alike.
In this article, I will tell you about the top forex tools that every trader should use to minimise the effort and optimise their performance.
- Forex Economic Calendar
Before you step into a financial market, you need to understand the factors that influence the fluctuations in the market as that is the only way to make sound decisions. When it comes to the forex market, macroeconomic indicators, geo-political events, international news and even environmental issues can cause turbulence and sudden shifts in market sentiments. The value of currencies is very volatile and the prices of currency pairs keep moving.
The interest rate policy of a country’s central bank and the key economic data releases that reveal the strength or weakness of an economy can result in sudden volatility in the related pairs. It would be hard to know everything that is happening around the world and that’s why an economic calendar is an essential item in a trader’s toolkit. It tells you the date and time of important events that are likely to impact the prices of a currency pair along with forecasts based on past data.
- Forex Calculators
Forex calculators are a bunch of simple tools that are programmed to perform trade-related calculations on your behalf. Whether it is about finding ideal trade setups or determining the best prices for entry and exits, it all comes down to the accuracy of your analysis and calculations. Even the cost of trading needs to be estimated in advance or else your earnings will be lesser than what you expected in the beginning. You can use a profit calculator to compute the gains from a trade in the currency of your choice. It’s a very useful tool for all traders, especially those who maintain a trading journal.
There are different types of calculators designed for different functions and they save your time while simplifying the calculations.
- Currency Conversion Calculator – Conversion of one currency to another is the very essence of forex trading. Thus, you must be using a currency conversion calculator that applies the currency conversion rates to convert the amount that you enter into it. Then, you have to select the currencies. If you want to convert $100 to Australian Dollar, you can simply enter ‘100’ as the amount and pick USD in the ‘From’ drop-down list and AUD in the ‘To’ drop-down list. Then, the online calculator will display the current conversion rate and the amount after the conversion right away.
- Margin Calculator – A specific amount of money should be there in your account to open and hold trade positions. This amount is calculated by using a margin calculator. When you trade with leverage, the margin amount will be a percentage of the total money needed for opening a trade. The margin will be lower for a higher leverage ratio, allowing you to enter bigger trades with a smaller amount of money.
If your account balance is not enough to meet the margin requirement, you will be asked to deposit additional funds to keep the trades running (margin call) and in case of default, the broker will close the trades to prevent further losses. You have to specify the trading instrument, lot size and leverage ratio along with your base currency to determine the margin.
- Pip Calculator – The standard forex unit that tracks and measures the price changes in currency pairs is the price interest point or pip. Thus, counting the pips is very important to manage your risk and maximise the profits which can be done by using a pip calculator that converts the pip value to the currency of your choice. The value of 1 pip is 0.01 for pairs including Japanese Yen and 0.0001 for all other pairs.
The trade size and current conversion rate are applied to find the value of pips. By knowing the pip value, you can set the profit target based on the number of pips by which the price has to move from the entry price. The same can be done to find the best price level for a stop loss to limit the potential losses.
- Profit Calculator – As I said earlier, the profit calculator is used to estimate the earnings of a trade in your base currency. You just have to select the currency pair and enter the lot size, opening price and closing price into the calculator. It is a straightforward method to assess your profitability.
- Time Zone Converter
A time zone converter can be used to find the timings of various trading sessions in your local time zone and take advantage of the round-the-clock nature of the forex market based on your schedule and preferred currency pairs. Because some sessions are better for trading certain currency pairs due to the market activity and liquidity.
- Currency Correlation Matrix
The currency pairs in the forex market tend to move together in the same or opposite direction depending on the type of correlation between them. The currency correlation matrix is a useful tool to trade correlated pairs and all traders should use it to minimise the risk through diversification.
- Heat map
Heat map is a simple yet powerful tool that helps you to analyse the scale of movements happening in different currency pairs in a comprehensive way as it is presented in visual format. By using a heat map, you can identify the extent to which a currency pair price is fluctuating in a specific period of time. This tool is very helpful in adapting to the market situation while looking for trade setups.
- Trader Sentiment Indicator
This tool lets you know about the overall market sentiment by showing the percentage or proportion of buyers and sellers in the market. If there are more buyers, it suggests bullish sentiment and if sellers are more, the sentiment is bearish. The trader sentiment indicator can be added to your toolkit for discovering the directional bias before making a trading decision.
- Trading Journal
A trading journal is like a record to keep track of your trading activities in a systematic manner. By using this tool, you can track your progress and correct any mistakes by spotting them in time through regular assessments.
Key Takeaways
- The forex economic calendar must be used by every trader for fundamental analysis of the market situation.
- Forex calculators and time zone converters are very important to ensure precision in planning and execution of your strategy.
- The heat map, trader sentiment indicator and currency correlation matrix provide key information to make wise choices.
- The trading journal is a tool to stay true to your plan and track your progress.
📺 Introduction
In today’s digital world, choosing the right screen technology can make a big difference in your viewing experience. Whether you’re buying a new TV, monitor, or smartphone, you’ll likely come across two common display types: LED and LCD.
But what exactly is the difference between LED and LCD? And which one should you choose in 2025?
This article breaks it down in simple terms so you can make an informed, tech-savvy decision. We’ll also explore advanced display variations and key considerations to help you choose the right screen for your home, office, or gaming setup.
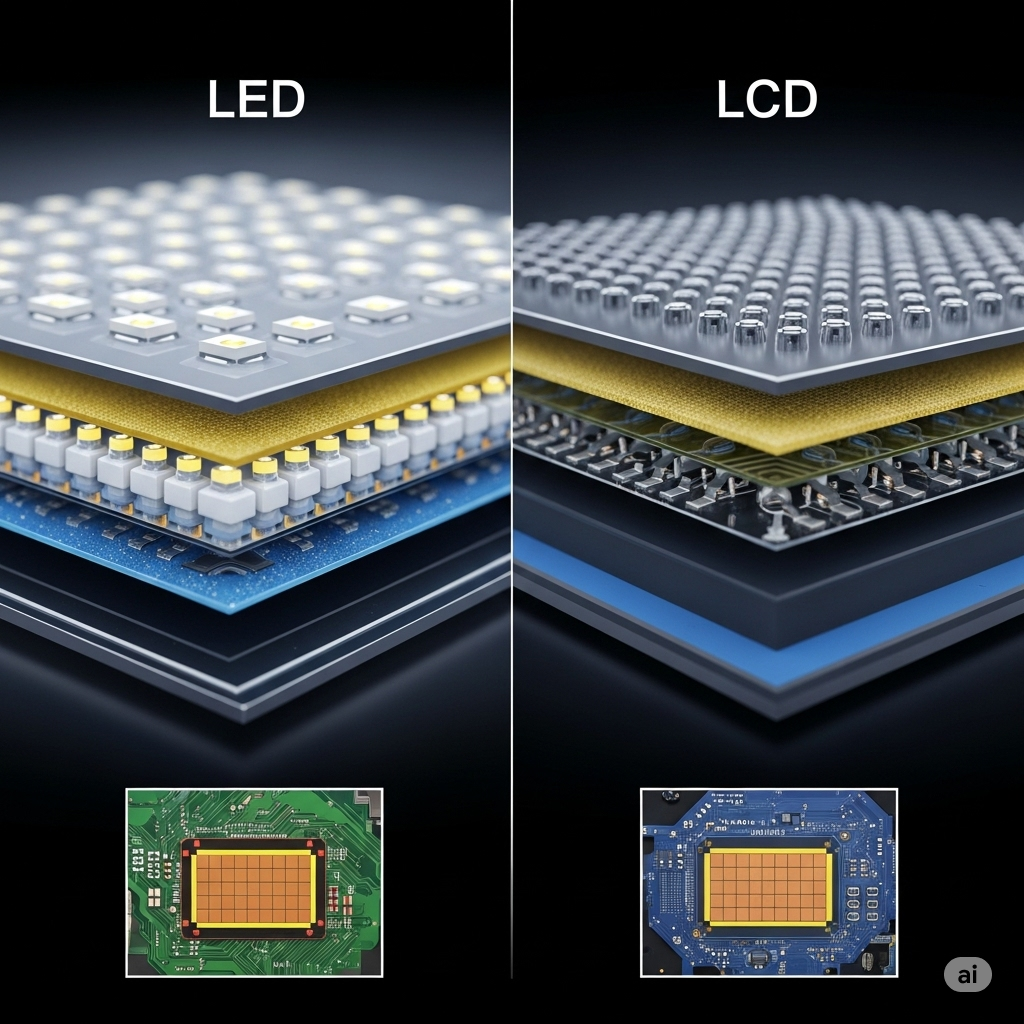
🔍 What is LCD?
LCD stands for Liquid Crystal Display. It uses liquid crystals sandwiched between two layers of glass or plastic and a backlight to produce images.
How it works:
- Light from a fluorescent lamp (usually CCFL) passes through a polarizing layer.
- Liquid crystals manipulate the light to form images.
- A color filter adds color to the grayscale images formed by the crystals.
Key Features:
- Requires fluorescent backlighting
- Produces images by filtering light through liquid crystals
- Commonly found in budget TVs, monitors, calculators, digital watches
Pros:
- Low production costs
- Good for general use
- Energy efficient compared to older tech like CRT
Cons:
- Weaker contrast and color accuracy
- Slower response times
- Less energy efficient than LED
💡 What is LED?
LED stands for Light Emitting Diode, and LED displays are a subset of LCD technology that uses LED backlights instead of CCFLs.
How it works:
- A panel of white or RGB LEDs emits light behind or on the edge of the LCD panel.
- Provides more precise lighting and dynamic contrast.
Types of LED Displays:
- Edge-Lit LED: LEDs placed along the edges; allows for thinner displays.
- Full-Array LED: LEDs placed evenly behind the panel for better contrast.
- Mini-LED (2025 trend): Uses thousands of tiny LEDs for sharper brightness control.
Pros:
- Slimmer designs
- Higher brightness and contrast
- Greater color accuracy and energy efficiency
- Longer lifespan than standard LCDs
Cons:
- Costlier than LCDs
- Edge-lit models may have uneven lighting
🆚 LED vs LCD: Key Differences
| Feature | LCD | LED |
|---|---|---|
| Backlighting | CCFL (fluorescent) | LED (light-emitting diode) |
| Brightness | Moderate | High |
| Energy Efficiency | Medium | High |
| Color Accuracy | Average | Better |
| Lifespan | Shorter | Longer |
| Viewing Angles | Narrower | Wider (especially IPS LEDs) |
| Cost | Lower | Slightly higher |
Learn more about emerging display technologies and their applications at SpaceCoastDaily.co.uk
📱 Advanced Variants to Consider in 2025
🔹 QLED (Quantum Dot LED)
- Developed by Samsung
- Uses quantum dots to improve color range and brightness
- Better than LED in terms of vibrancy
🔹 OLED (Organic LED)
- Individual pixels emit light (no backlight needed)
- Excellent black levels, contrast, and ultra-slim design
- More expensive, used in high-end TVs and smartphones
🔹 Mini-LED
- Offers better control over dimming zones
- Reduces halo effects and improves dynamic range
- Becoming mainstream in high-end monitors and TVs
These technologies often build upon LED panels, offering better performance at a higher price.
📊 Use Cases: Which One Is Better for You?
📺 For Watching TV
- LED TVs are ideal due to better brightness, energy use, and sleek designs.
- Go for Full-Array LED for optimal movie experience.
💻 For Office Work
- LCD monitors are sufficient for word processing, browsing, and spreadsheets.
- LED provides less eye strain over long periods — recommended.
🎮 For Gaming
- LED monitors with high refresh rates and low response times are superior.
- Avoid basic LCDs due to ghosting and lag.
📱 For Smartphones/Tablets
- LED and OLED dominate the mobile space due to high-quality visuals and efficiency.
🧠 Final Thoughts
While LCD and LED both belong to the same display technology family, LED is significantly superior in most categories that matter to users today — including brightness, energy use, durability, and visual quality.
In 2025, unless you’re shopping on a very tight budget, LED should be your default choice. However, be aware of more advanced options like Mini-LED or OLED if your usage includes creative work, high-end gaming, or home cinema setups.
Looking for more tech comparisons and practical guides? Visit SpaceCoastDaily.co.uk for regularly updated articles and smart recommendations.
❓FAQ: LED vs LCD
Q1: Is LED better than LCD?
Yes. LED is generally better due to its superior brightness, contrast, and energy efficiency.
Q2: Do LED TVs last longer than LCD?
Yes, they tend to have longer lifespans and better reliability.
Q3: Are LED screens more expensive?
Slightly, but they offer better value over time.
Q4: Can I use an LCD monitor for gaming?
Yes, but modern LED monitors are much better suited for gaming due to faster refresh rates.
Q5: Is OLED the same as LED?
No. OLED is a different, more advanced technology that offers individually lit pixels and deeper blacks.
Q6: What is Mini-LED and should I consider it?
Mini-LED is a newer version of LED offering improved contrast and brightness. It’s ideal for professionals and enthusiasts.
🌞 Introduction
Want to cut down your electricity bills and reduce your carbon footprint? A DIY solar panel setup for home might be the solution you’re looking for. With solar technology becoming more affordable and efficient, more homeowners are turning to solar power as a long-term investment in sustainability.
In this guide, we’ll break down everything you need to know about setting up a solar panel system yourself—from equipment selection to installation and maintenance. Whether you’re a total beginner or somewhat handy, you’ll walk away ready to go solar, save money, and take control of your home’s energy use.
⚡ Why Choose a DIY Solar Panel Setup for Home?
💰 Cost Savings
One of the biggest advantages of going DIY is saving on labor costs. Hiring professionals can cost thousands, while a DIY setup significantly lowers your total investment.
🌱 Environmental Impact
Solar power is clean and renewable. A typical home system can reduce 3 to 4 tons of carbon emissions annually.
💡 Energy Independence
Producing your own electricity reduces dependence on utility companies and protects you from rising energy prices.
🧰 What You Need for a DIY Solar Panel Setup
Before diving into the installation process, gather these key components:
1. Solar Panels
-
Choose monocrystalline for higher efficiency.
-
Polycrystalline is cheaper but slightly less efficient.
2. Inverter
-
Converts DC (from panels) into AC (for your home).
-
Types: String inverter, microinverters, hybrid inverters.
3. Charge Controller
-
Regulates voltage and current from panels to batteries.
-
Prevents battery overcharging.
4. Battery Bank (Optional but Recommended)
-
Stores excess power for use during night or outages.
-
Lithium-ion batteries are ideal but expensive.
5. Mounting System
-
Roof mounts or ground mounts, based on your space.
-
Ensure they’re durable and weather-resistant.
6. Wiring and Connectors
-
Solar-grade cables (MC4 connectors recommended).
-
Proper fuses and circuit breakers for safety.
7. Net Meter (Optional)
-
For grid-tied systems to earn credit on your power bill.
🛠️ Step-by-Step: How to Install DIY Solar Panels at Home
🔍 Step 1: Assess Your Energy Needs
-
Review your electricity bills (monthly kWh usage).
-
Decide whether to go off-grid, grid-tied, or hybrid.
📐 Step 2: Site Evaluation & Solar Access
-
Use tools like PVWatts or Google Project Sunroof.
-
Ensure your roof gets at least 5-6 hours of direct sunlight daily.
🧮 Step 3: Calculate System Size
-
Average home uses ~900 kWh/month.
-
A 5 kW system (~15-20 panels) usually covers this.
🛒 Step 4: Purchase Equipment
Buy from trusted suppliers with warranty options. For top-tier solutions, check out Circle Solar, a leader in sustainable solar energy solutions.
🔧 Step 5: Install Mounting & Panels
-
Attach the mounting system to your roof or ground.
-
Secure panels onto the racking system.
🔌 Step 6: Connect Electrical Components
-
Wire panels → charge controller → battery bank → inverter → home grid.
-
Ensure all safety disconnects and grounding are in place.
📋 Step 7: Inspection & Activation
-
Get local authority inspection if required.
-
Turn on the system and monitor output via your inverter app or meter.
🔄 Maintenance Tips for Long-Term Efficiency
-
Clean panels 2-3 times a year to remove dust and debris.
-
Check wiring annually for signs of wear or corrosion.
-
Monitor performance with apps or online dashboards.
🧠 Pro Tips for DIY Success
-
Start small: Begin with a portable or single-panel system if you’re new.
-
Take safety seriously: Wear protective gear and follow all electrical codes.
-
Consult your utility provider: Especially for grid-tied systems.
🌐 Real-World Success: Why People Are Going Solar
More and more UK residents are adopting DIY solar power to fight rising energy costs and embrace a sustainable lifestyle. Platforms like Space Coast Daily regularly feature success stories and resources on renewable energy—proving that the solar movement is thriving.
✅ Conclusion: Ready to Harness the Sun?
Installing a DIY solar panel setup for home is not just a trend—it’s a smart investment in your future. With the right tools, planning, and guidance, you can generate your own clean electricity and gain true energy independence.
So, are you ready to start your solar journey? Bookmark this guide, explore Space Coast Daily for the latest in sustainable energy trends, and consider checking out Circle Solar for premium components that last.
❓ FAQ: DIY Solar Panel Setup for Home
Q1: Is it legal to install solar panels myself?
A: Yes, in most regions, DIY installations are legal. However, check your local codes and permit requirements.
Q2: How much does a DIY solar system cost?
A: Expect to spend between £3,000 to £6,000, depending on system size and quality.
Q3: Can I run my entire house on solar?
A: Yes, with a properly sized system and battery backup, you can power your whole home.
Q4: How long do solar panels last?
A: Most panels come with a 25-year warranty and can last even longer with proper care.
Q5: Do I need batteries for my solar system?
A: Batteries are optional but useful for off-grid setups and backup during outages.

📝 Introduction
Artificial intelligence is rapidly transforming how we interact online, and Janitor AI is one of the most buzzed-about names in the chatbot space—especially for users looking for customizable, conversational, and even NSFW AI interactions.
Whether you’re exploring it for entertainment, roleplay, or productivity, this guide covers everything you need to know about Janitor AI in 2025—from how it works, its features, limitations, and even the controversy surrounding it. If you’re curious, cautious, or ready to dive in, this is your ultimate reference.
🤖 What is Janitor AI?
Janitor AI is an advanced AI chatbot platform that allows users to interact with a variety of characters—ranging from anime-style bots to customizable virtual personalities. Unlike traditional AI chat tools, Janitor AI focuses heavily on character roleplay, storytelling, and human-like interaction.
Many users have been drawn to the platform due to its allowance (at times) for NSFW (Not Safe For Work) conversations, making it popular among adult users. However, its capabilities extend beyond that.
🔹 Key Features:
-
Character-based AI chats (custom bots)
-
NSFW and SFW modes (optional)
-
GPT-based responses (OpenAI or Kobold API supported)
-
Voice synthesis (in some versions)
-
Public character library
📌 Janitor AI Use Cases in 2025
Despite the controversy, Janitor AI is being used for several legitimate and interesting purposes:
1. Roleplay & Storytelling
Writers and fans use the platform for:
-
World-building
-
Character interaction testing
-
Generating dialogues for scripts and comics
2. Entertainment & Fun
-
Anime fan chats
-
Simulated romantic convos
-
Gaming companion bots
3. Mental Health & Venting
Some users engage with soft-spoken bots to:
-
Simulate therapy
-
Talk out problems
-
Seek non-judgmental conversation
4. Productivity Simulation
-
Practice job interviews
-
Language learning through simulated chats
-
Train customer service interactions
🛠️ How Janitor AI Works
Janitor AI is not powered by its own LLM (Large Language Model). Instead, it connects with external APIs like:
-
OpenAI (ChatGPT) – for safe, filtered interactions
-
KoboldAI or Pygmalion – for unfiltered/NSFW content
-
Local Models (e.g., SillyTavern) – for privacy-focused chats
To use Janitor AI:
-
Sign up and login at [janitorai.com] [EXTERNAL LINK]
-
Choose a character from the public library or create your own.
-
Connect an API key (OpenAI or KoboldAI).
-
Start chatting with the bot of your choice.
⚠️ Note: You must configure API settings correctly. Many users get errors if APIs are not linked.
🚫 NSFW & Content Safety: The Big Debate
One of the reasons Janitor AI became viral is because it allowed NSFW chats, especially using Pygmalion or OpenRouter APIs.
However, this has sparked massive debates online, especially around:
-
AI ethics
-
Age restrictions
-
Content moderation
In 2024-2025, Janitor AI removed direct NSFW support on its main platform, but users still bypass this using external APIs or local installations.
🔒 Tips for Safe Use:
-
Use a local model if privacy is a concern.
-
Never share real personal data.
-
Check if the bot creator has moderation settings enabled.
-
Keep SFW mode on if under 18 or in public/shared devices.
📈 Why Janitor AI is So Popular in 2025
| Reason | Description |
|---|---|
| Customizable Bots | Create your own characters with unique personalities |
| Roleplay Freedom | Many bots simulate romantic or fantasy dialogues |
| Easy to Use | No coding needed, simple UI |
| Cross-Platform | Use in browser, Discord bots, or third-party apps |
| Large Community | Public bots, shared prompts, guides available |
🔄 Janitor AI Alternatives (2025)
If Janitor AI doesn’t suit your needs, here are some trending alternatives:
1. Character.AI
-
Family-friendly
-
No NSFW content
-
Great UI & mobile app
2. Chai App
-
Available on Android & iOS
-
Tons of user-generated bots
-
Less control over filtering
3. Pygmalion AI + SillyTavern
-
Fully unfiltered
-
Requires setup
-
Works offline with local LLMs
4. OpenAI Playground (ChatGPT)
-
Reliable for clean conversations
-
Limited in roleplay compared to Janitor
📌 For a comparison article, see: [Janitor AI vs Character AI – Which is Better?] [INTERNAL LINK]
💻 Developer & Community Tools
If you’re a developer or enthusiast, Janitor AI allows:
-
Bot creation: Customize prompts, memories, behavior.
-
API linking: Choose your preferred backend model.
-
Community uploads: Share your bot with others.
-
Third-party mods: Chrome extensions, Discord integrations
Some devs even run private versions of Janitor AI using open-source tools like:
-
JanitorAI-Local
-
Sillytavern UI
-
KoboldCPP
✅ Pros and Cons
| Pros | Cons |
|---|---|
| Deep roleplay capabilities | May violate ethical/age guidelines |
| Supports multiple AI backends | Complex setup for unfiltered APIs |
| Active community & support | NSFW misuse concerns |
| Free to use (with API) | Not beginner-friendly without guides |
📌 Conclusion (with Links Added)
Janitor AI is much more than just another chatbot it’s a powerful, flexible platform for those looking to dive into immersive conversations with fictional, realistic, or AI-generated characters. Whether you’re writing a fantasy novel, simulating a companion, or just killing time, it opens up countless possibilities.
But with great flexibility comes responsibility. Use Janitor AI ethically, protect your privacy, and respect the boundaries of content guidelines.
Want to explore more ways to leverage AI? Check out our guide on
👉 How to Make Money with ChatGPT in 2025 – 10 Proven Methods
Or visit our homepage for more trending AI tools, tech updates, and tutorials:
🌐 SpaceCoastDaily.co.uk
❓ FAQ – Janitor AI 2025
Q1: Is Janitor AI free to use?
Yes, the platform is free, but you’ll need to connect your own API key (like OpenAI, Kobold, or Pygmalion).
Q2: Is NSFW content still available?
Officially, NSFW content is restricted. However, users can still access it via third-party APIs or local setups.
Q3: Is Janitor AI safe?
It’s generally safe if you use trusted APIs and don’t share personal info. For NSFW use, caution is advised.
Q4: Can I use it without coding?
Yes, Janitor AI has a user-friendly interface. You only need to copy-paste API keys.
Q5: What is the best API for Janitor AI?
For filtered, ethical use: OpenAI. For unfiltered creative freedom: KoboldAI or Pygmalion.

Itchko Ezratti Net Worth (2025): GL Homes Founder’s Wealth & Influence Explained

Best Shoes for Neuropathy: Ultimate 2025 Guide to Comfort and Relief

Voice AI in 2025: How It’s Reshaping Tech, Business, and Daily Life


-

 Tech1 week ago
What is Janitor AI? Features, Use Cases & How to Use It Safely in 2025
-
 news1 week ago
Binomo Scam Exposed: Real Truth Behind the Trading App You Must Know in 2025
-
 news1 week ago
ChatGPT vs Google Gemini: Which AI Wins in 2025?
-
Business4 weeks ago
Why Bulk Custom Playing Cards Are the Secret Weapon for Brand Visibility and Creative Projects
-

 news2 weeks ago
James Webb Telescope News: Exploring the Frontiers of the Universe
-

 Gaming2 weeks ago
Best Gaming Accessories Under $50 in 2025 – Ultimate Budget Gaming Upgrades
-
 Tech2 weeks ago
Portalar (PortalAR) Guide 2025: How AR Portals Transform Environments
-
Tech4 weeks ago
Revolutionizing Marketing with AI: How Visionation Helps Brands Dominate Google Rankings