
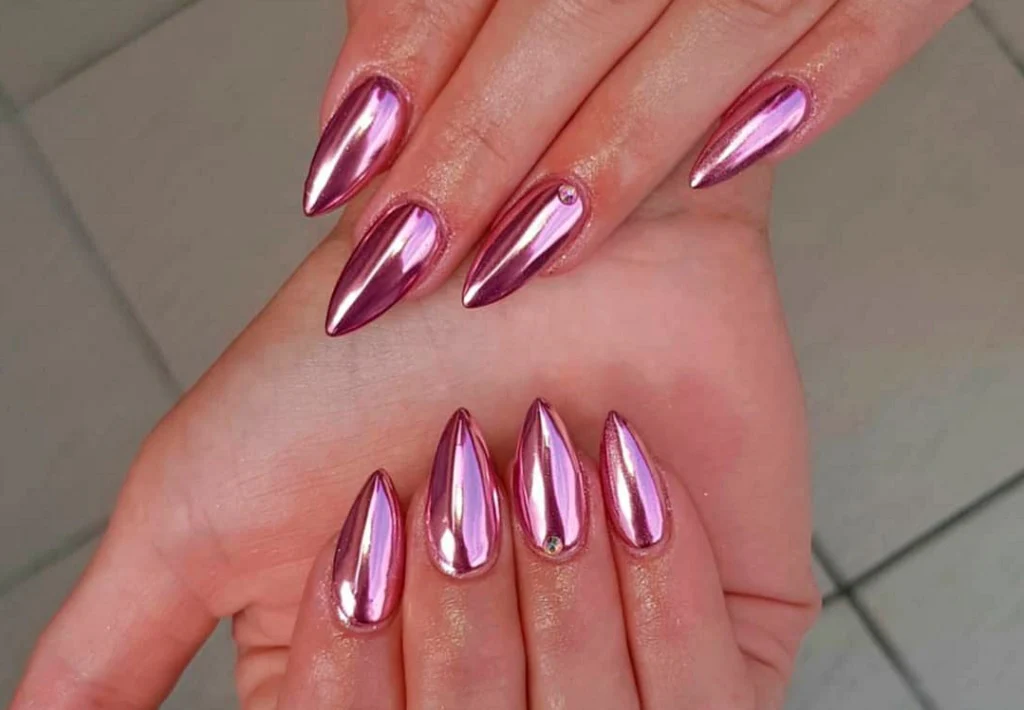
Pink chrome nails are the perfect combination of playful and sophisticated. They boast a high-shine, mirror-like finish that reflects light and adds a touch of glamour to any outfit. Whether you prefer a soft baby pink or a bold fuchsia, there’s a pink chrome shade to suit your style.
This article delves into the world of pink chrome nails, exploring everything you need to know about achieving this eye-catching look.
The Allure of Pink Chrome Nails
Pink chrome nails offer several advantages:
- High-Shine Finish: The chrome effect creates a dazzling, reflective surface that turns heads.
- Versatility: Pink chrome can be dressed up or down, making it suitable for various occasions.
- Durability: Chrome finishes tend to be more chip-resistant than regular polishes, especially when done with gel polish.
- Variety of Shades: There’s a spectrum of pink chrome shades available, from soft pastels to vibrant fuchsias.
- Statement Piece: Pink chrome nails are guaranteed to be a conversation starter.
Achieving the Perfect Pink Chrome Look: DIY vs. Salon
There are two main ways to achieve pink chrome nails: at a salon or with a DIY manicure at home.
Salon Manicure:
- Pros: A professional nail technician can ensure a flawless chrome finish and offer expert advice on choosing the perfect shade and design.
- Cons: Salon manicures can be more expensive than DIY options.
DIY Manicure:
- Pros: DIY manicures are more affordable and allow you to experiment at home.
- Cons: Achieving a perfect chrome finish can be challenging, especially for beginners.
The choice between salon and DIY ultimately depends on your budget, comfort level, and desired level of complexity.
DIY Pink Chrome Nails: A Step-by-Step Guide
Ready to create your own pink chrome masterpiece? Here’s a step-by-step guide:
Materials:
- Base coat
- Pink gel polish (optional, for a more vibrant chrome effect)
- Black gel polish (optional, for a deeper chrome effect)
- Chrome nail powder in your desired shade of pink
- Gel top coat
- Nail polish remover
- Lint-free wipes
- UV or LED nail lamp
- Applicator brush or eyeshadow sponge (for applying chrome powder)
- Cuticle pusher (optional)
Instructions:
- Prep your nails. Push back your cuticles (optional) and gently buff the surface of your nails with a nail buffer to remove any shine and create a better grip for the polish. Wipe your nails clean with a lint-free wipe soaked in nail polish remover to remove any oils or debris.
- Apply a base coat. Apply a thin layer of base coat to all your nails and cure it under the UV/LED lamp according to the manufacturer’s instructions.
- Apply gel polish (optional). For a more vibrant chrome effect, apply two thin coats of your chosen pink gel polish, allowing each coat to cure completely under the lamp. If you prefer a deeper chrome, use black gel polish instead.
- Apply a thin layer of top coat (optional). This step helps create a smooth surface for the chrome powder. Cure it under the lamp.
- Apply the chrome powder. While the top coat is still slightly tacky (but not fully cured), use the applicator brush or eyeshadow sponge to buff the chrome powder onto each nail. Start with a small amount and gradually add more until you achieve the desired level of shine and opacity.
- Dust off excess powder. Use a clean brush to gently dust off any excess chrome powder from around your nails.
- Apply a top coat. Apply a generous layer of gel top coat to seal the chrome powder and protect your manicure. Cure it thoroughly under the lamp.
- Clean up. Use a cotton swab dipped in nail polish remover to clean up any polish that may have gotten on your skin.
Tips for a Flawless Finish:
- Work on one nail at a time to prevent the top coat from drying before applying the chrome powder.
- Use a light touch when buffing the chrome powder. Too much pressure can result in a patchy finish.
- Layer the chrome powder for a more intense shine.
- Apply a thicker layer of top coat for extra durability.


Leave a Reply